How To: Using Cyberduck for iRODS File Transfers
Cyberduck is a free open source file transfer program for MacOS and Windows that supports several different transfer protocols (e.g., FTP, WebDAV). As of version 4.7.1, released July 7, 2015, Cyberduck supports direct data transfer into and out of iRODS. Cyberduck users can now directly upload and download files and directories from iRODS repositories using the high-throughput and parallel data transfer capabilities built into iRODS.
iRODS support in Cyberduck is due to the extraordinary efforts of the DataNet Federation Consortium (DFC) and DFC member the iPlant Collaborative, with assistance from the Cyberduck development team.
This post covers the installation and configuration of Cyberduck for use with iRODS. This is a slightly modified version of the instructions written by iPlant for use with the iPlant Data Store.
Installing and configuring Cyberduck
Install or Update Cyberduck
If Cyberduck is already installed, check if you need to update (must be version 4.7.1 or later):
- Click the Cyberduck menu.
- Click Preferences and then click Check for Updates.
To install Cyberduck for your operating system for the first time:
Go to the Cyberduck installation page at https://cyberduck.io/.
Follow the steps for your OS:
For MacOS:
-
Click Download Cyberduck-4.7.1.zip (or later version than 4.7.1).
-
Extract and move the contents of the downloaded file to your Applications folder. IMPORTANT: The file must be located in your Applications folder.
Alternatively, you can install Cyberduck for Mac OS directly through the Mac Store for a fee that supports the Cyberduck development team.
For Windows:
-
Click Download Cyberduck-Installer-4.7.1.exe (or later version than 4.7.1, if displayed).
-
Locate the downloaded file and double click to begin installation.
-
Go through the install process.
Configure Cyberduck for use with iRODS
To connect Cyberduck to an iRODS repository, you must first bookmark the connection using a .cyberduckprofile Connection Profile file.
-
Click this link to download a Connection Profile template, which contains preconfigured settings for using Cyberduck with iRODS repositories.
-
Use a text editor to edit the contents of the Connection Profile.
At a minimum, you will need to edit the "Region" key with the iRODS Zone name and default resource that you will connect to in the format zone_name:resource_name. You may also edit the default hostname, or you may opt to configure it at runtime.
Save the updated Connection Profile.
<?xml version="1.0" encoding="UTF-8"?>
<!DOCTYPE plist PUBLIC "-//Apple//DTD PLIST 1.0//EN" "http://www.apple.com/DTDs/PropertyList-1.0.dtd">
<plist version="1.0">
    <dict>
        <key>Protocol</key>
        <string>irods</string>
        <key>Vendor</key>
        <string>iRODS</string>
        <key>Description</key>
        <string>iRODS Cyberduck Bookmark</string>
        <key>Hostname Configurable</key>
        <true/>
        <key>Port Configurable</key>
        <true/>
        <key>Default Hostname</key>
        <string>hostname.example.org</string>
        <key>Region</key>
        <string>tempZone:demoResc</string>
        <key>Default Port</key>
        <string>1247</string>
        <key>Username Placeholder</key>
        <string>iRODS username</string>
        <key>Password Placeholder</key>
        <string>iRODS password</string>
    </dict>
</plist>
-
Double click the updated irods.cyberduckprofile file to open it as a Cyberduck bookmark. The profile will open so you can edit the defaults.
-
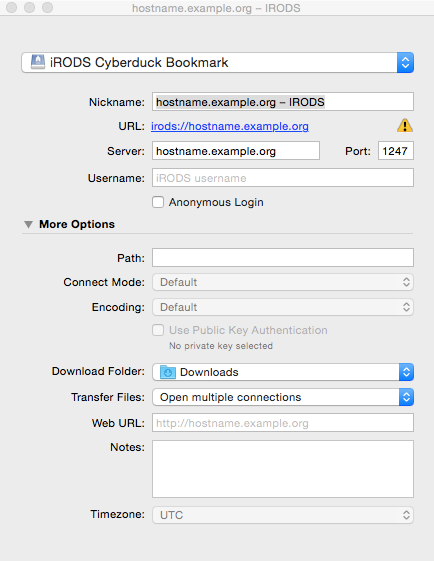
Update the Cyberduck bookmark.
- Update the Nickname field with an appropriate name to identify the bookmark.
- Update the Server field with the hostname of your iRODS server.
- Update the Port field with the port number of your iRODS server (typically 1247).
- Update the Username field with your iRODS user name.
- In the More Options section, update the "Transfer Files" setting, selecting "Open multiple connections".
- Close the bookmark window.
Using Cyberduck
These instructions provide basic instructions for downloading and uploading files to an iRODS repository using Cyberduck.
For more information on how to use Cyberduck, please see the Cyberduck Help manual, the Cyberduck FAQs, or contact Cyberduck Support.
Open Cyberduck
In the Cyberduck window, double-click a bookmark.
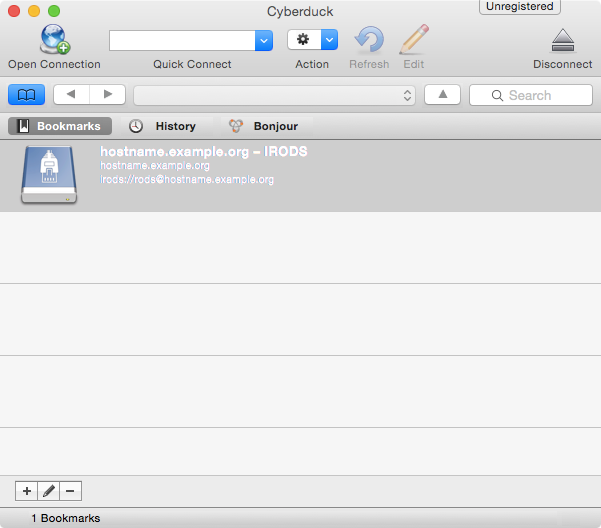
Log in to the iRODS server using your iRODS username and password. By default, your Home folder is selected.
Once connected, to download a file or folder from iRODS using Cyberduck:
-
Click the file or folder to download.
-
Click the Cyberduck File menu and then click Download. The file is downloaded to your default download folder.
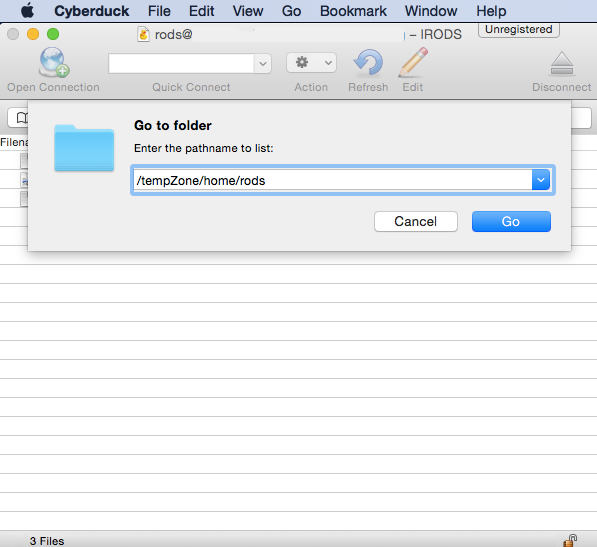
To navigate to a different folder:
Click the Cyberduck Go menu and then click Go to Folder:
- Enter the path to the folder.
- Click Go.
Upload
To upload a file or folder to an iRODS repository using Cyberduck:
-
Click the Cyberduck File menu and then click Upload.
-
Click the file or folder to upload and then click Upload.
Need help?
See the Cyberduck Preferences Help page for more information on installation, or connect with us on the iRODS Chat Google Group. If you are at an iRODS Consortium member site, you may contact us directly for support.
For questions about using Cyberduck, please see the Cyberduck Help manual, the Cyberduck FAQs, or contact Cyberduck Support.
Dan Bedard